Starsim is a framework for creating agent-based models, and the People class is where we store the agents, so it should come as no surprise that this class serves as the fundamental heart of any Starsim model. In this page we provide alternative pathways for creating people and some guidance on how to adapt these workflows depending on your needs.
We start by giving an overview on this page of Starsim’s custom Arr (array) classes, which are a separate but related Starsim class designed to neatly track data about people.
Starsim states and arrays
Starsim has a set of custom array classes for recording information about each agent in the population. The two fundamental types of array for storing such infomation are the BoolState class, which is a Boolean array, and the FloatArr class, which stores numbers (we don’t distinguish between floats and integers, so all numbers are stored in these arrays). Each of these is a subclass of the Starsim Arr class.
The Arr class in Starsim is optimized for three key tasks that are common to almost all Starsim models:
Dynamic growth: as the population grows over time, the size of the arrays dynamically update in a way that avoids costly concatenation operations;
Indexing: over time, there are agents in the population who die. It is desirable for these agents to remain in the arrays so that we can continue to access data about them, but the indexing is set up so that dead agents are automatically excluded from most operations.
Stochastic states: we often want to set the values of a state by sampling from a random variable (e.g. sex might be drawn as a Bernoulli random variable). Starsim’s Arr class can be initialized with a random variables; we will provide examples of this below.
All agents have a uid (universal identifier), which corresponds to their position in the array. Starsim keeps track of a list of auids (active UIDs), corresponding to agents who are alive or are otherwise participating in the simulation. This way, Starsim knows to skip over dead agents (or otherwise removed, e.g. from migration) when calculating disease progression, aging, etc.
In most cases, you shouldn’t need to worry about uids, auids, etc. However, this example illustrates how they work:
import sciris as scimport starsim as ssss.options(jupyter=True)sim = ss.Sim(start=2000, stop=2020, n_agents=1000, diseases='sir', networks='random', demographics=True, verbose=False)sim.init()sc.heading('Initial state')ppl = sim.peopleprint('Number of agents before run:', len(ppl))print('Maximum UID:', ppl.uid.max())print('Mean age:', ppl.age.mean())sc.heading('After running the sim')sim.run()res = sim.resultsprint('Number of agents after run:', len(ppl))print('Number of agents who were born:', sim.results.births.cumulative[-1])print('Number of agents who died:', sim.results.cum_deaths[-1])print('Maximum UID:', ppl.uid.max())print('Size of the raw arrays:', len(ppl.uid.raw))print('Mean age of alive agents:', ppl.age.mean())
—————————————

Initial state

—————————————


Number of agents before run: 1000

Maximum UID: 999

Mean age: 31.025518


—————————————————————

After running the sim

—————————————————————


Number of agents after run: 1197

Number of agents who were born: 428.0

Number of agents who died: 231.0

Maximum UID: 1427

Size of the raw arrays: 1500

Mean age of alive agents: 38.27644
Creating default people
When you create a sim, it automatically creates People, and you can use the n_agents argument to control the population size:
import numpy as npimport pandas as pdimport starsim as ss sim = ss.Sim(n_agents=1000) # Create a sim with default peoplesim.init()
Initializing sim with 1000 agents
Sim(n=1000; 2000—2050.0)
The People that are added to the Sim come with the following default states and arrays:
alive, a State that records whether each agent is alive
female, a State that records whether each agent is female
ti_dead, a FloatArr that records the time of death, NaN by default
scale, a FloatArr that records the number of people that each agent represents; 1 by default.
Creating custom people
Rather than relying on the Sim to create people, you can create your own People and add them to the Sim as a separate argument. The example below is equivalent to the one immediately above:
people = ss.People(1000)sim = ss.Sim(people=people)
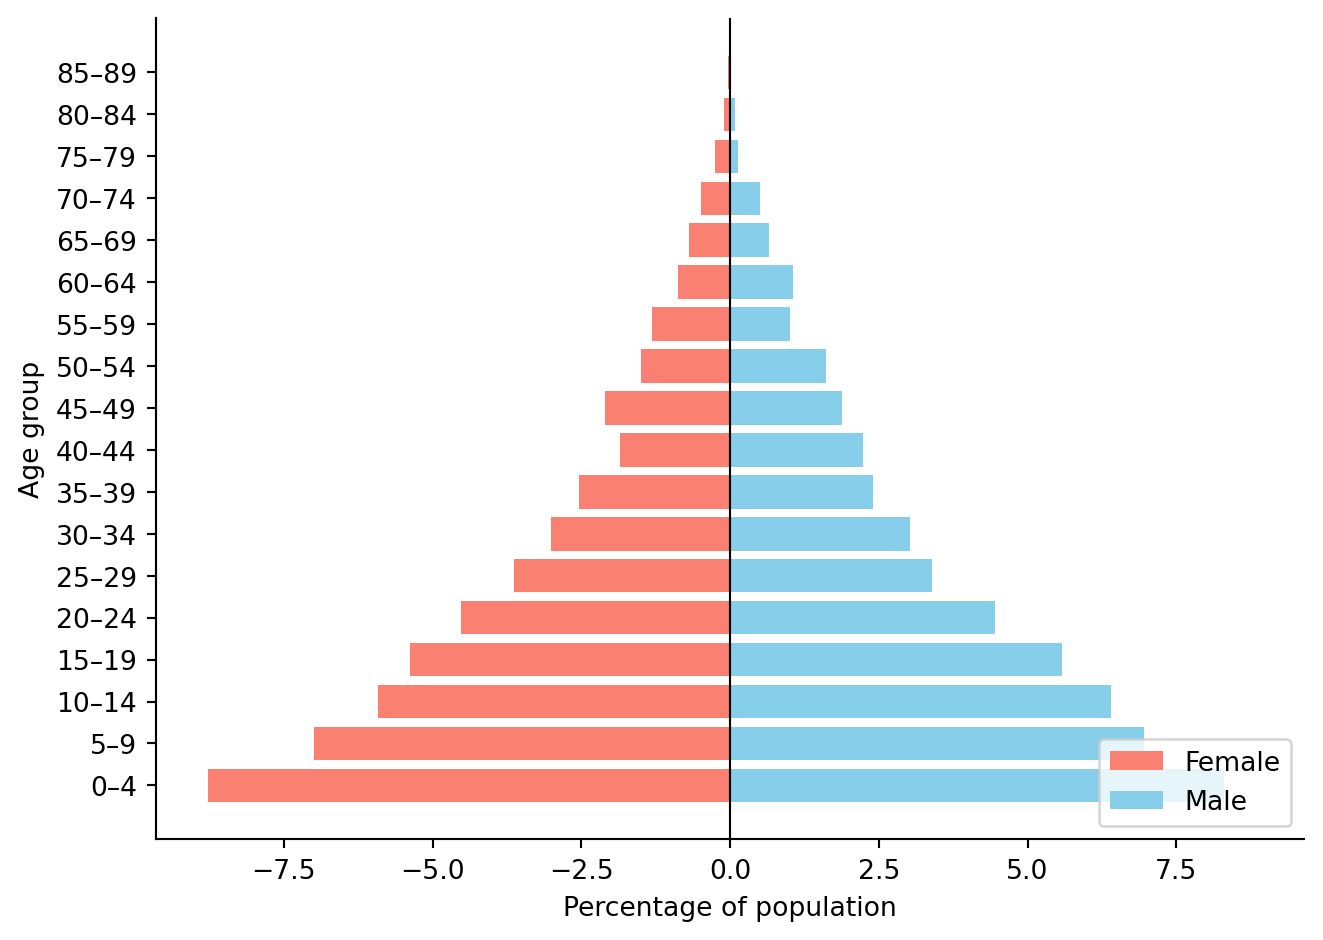
The main reason to create custom people is if you want to specify a particular age/sex distribution. The following example creates a population with the age distribution of Nigeria:
Initializing sim with 10000 agents
Figure(672x480)
Another reason to create custom people is if there are additional attributes that you want to track. Let’s say we want to add a state to track urban/rural status. The example below also illustrates how you can add a stochastic state whose values are sampled from a distribution.
def urban_function(n):""" Make a function to randomly assign people to urban/rural locations """return np.random.choice(a=[True, False], p=[0.5, 0.5], size=n)urban = ss.BoolState('urban', default=urban_function)ppl = ss.People(10, extra_states=urban) # Create 10 people with this statesim = ss.Sim(people=ppl)sim.init() # Initialize the sim --> essential step to create the people and sample statesprint(f'Number of urban people: {np.count_nonzero(sim.people.urban)}')
Initializing sim with 10 agents
Number of urban people: 8
Modifying People with modules
We saw an example above of adding a custom state to people. However, a far more common way to add states to people is by adding a module to the Sim. All the states of the modules will automatically get added to the main People instance.
When states or arrays are added by modules, they are stored as dictionaries under the name of that module.
Note that the Starsim Arr class can be used like a Numpy array, with all the standard arithmetic operations like sums, mean, counting, etc.
Multi-column states
Sometimes each agent needs more than one value for the same quantity, such as immunity to each of several variants. Rather than defining one state per variant, you can give an array columns, which makes a 2D array with one row per agent and one column per value. Like any other state, it grows as agents are born:
class Immunity(ss.Module):""" Track susceptibility to two variants, with susceptibility to the mutant decreasing over time """def__init__(self, **kwargs):super().__init__(**kwargs)self.define_states( ss.FloatArr('sus_imm', columns=['wild', 'mutant'], default=1.0), )def step(self):self.sus_imm.mutant *=0.9# Update the "mutant" column for all agentsreturnimm_sim = ss.Sim(n_agents=1000, modules=Immunity(), demographics=True, dur=5, verbose=False).run()imm = imm_sim.people.immunity.sus_immprint('Number of agents:', len(imm_sim.people))print('Shape of values:', imm.values.shape)
Number of agents: 1058
Shape of values: (1058, 2)
Named columns can be accessed as attributes (imm.mutant), as keys (imm['mutant']), or via imm.col('mutant'); each of these returns a regular 1D array, and assigning to it (e.g. imm.mutant = 0 or imm.mutant += 0.1) modifies the 2D array. When indexing, the first index selects agents as usual, and the second selects columns by name or by position:
uids = ss.uids([0, 1, 2])print('All columns for 3 agents:\n', imm[uids])print('Mutant column for 3 agents:', imm[uids, 'mutant'])print('Mean mutant susceptibility:', imm.mutant.mean())imm[uids, 'wild'] =0# Make these agents immune to the wild typeprint('Agents immune to the wild type:', (imm.col('wild') <0.5).uids)
All columns for 3 agents:
 [[1.        0.5314409]
 [1.        0.5314409]
 [1.        0.5314409]]
Mutant column for 3 agents: [0.5314409 0.5314409 0.5314409]
Mean mutant susceptibility: 0.5603617
Agents immune to the wild type: [0 1 2]
Since a 2D array has more than one value per agent, it can’t be converted to UIDs directly; use a single column instead, as above. Some other things to note:
Use e.g. columns=3 for unnamed columns (accessed by position only), or a tuple such as columns=(2,3) for more dimensions.
Column names must be unique, and can’t be the same as an array attribute or method (e.g. 'raw' or 'mean').
arr[:, [0,2]] returns columns 0 and 2 for every active agent.
people.to_df() exports one dataframe column per value, e.g. immunity.sus_imm_wild and immunity.sus_imm_mutant (or _0, _1, etc. for unnamed columns).
Debugging and analyzing
There are several ways to explore the People object. One way is by exporting to a dataframe:
df = sim.people.to_df()df.disp()
    uid  slot  alive      age  female  ti_dead  ti_removed  scale  randomnet.participant  sis.susceptible  sis.infected  sis.rel_sus  sis.rel_trans  sis.ti_infected  sis.ti_recovered  sis.immunity
0     0     0   True  31.9029    True      NaN         NaN    1.0                  False            False          True       0.7484            1.0             50.0           59.8571        1.2516
1     1     1   True  20.1963   False      NaN         NaN    1.0                  False             True         False       0.5669            1.0             27.0           37.2181        0.4331
2     2     2   True  27.7188   False      NaN         NaN    1.0                  False             True         False       0.6661            1.0             20.0           30.6485        0.3339
3     3     3   True  19.8975   False      NaN         NaN    1.0                  False            False          True       0.0339            1.0             47.0           57.2078        0.9661
4     4     4   True  24.3466   False      NaN         NaN    1.0                  False            False          True       0.6207            1.0             50.0           60.2779        1.3793
5     5     5   True  11.7957    True      NaN         NaN    1.0                  False            False          True       0.0348            1.0             44.0           52.9060        0.9652
6     6     6   True  32.1198   False      NaN         NaN    1.0                  False             True         False       0.5970            1.0             25.0           33.8887        0.4030
7     7     7   True  40.9630   False      NaN         NaN    1.0                  False             True         False       0.6766            1.0             20.0           30.9841        0.3234
8     8     8   True   5.7246    True      NaN         NaN    1.0                  False            False          True       0.0000            1.0             46.0           55.9629        1.3415
9     9     9   True  29.5681    True      NaN         NaN    1.0                  False             True         False       0.4751            1.0             28.0           38.0549        0.5249
10   10    10   True  12.1764    True      NaN         NaN    1.0                  False             True         False       0.4782            1.0             25.0           35.4281        0.5218
11   11    11   True  45.5516    True      NaN         NaN    1.0                  False            False          True       0.0000            1.0             45.0           53.8901        1.0915
12   12    12   True  40.1340   False      NaN         NaN    1.0                  False            False          True       0.1427            1.0             44.0           55.7875        0.8573
13   13    13   True  42.1071    True      NaN         NaN    1.0                  False            False          True       0.0000            1.0             40.0           50.2596        1.0585
14   14    14   True   0.2257   False      NaN         NaN    1.0                  False             True         False       0.3194            1.0             30.0           39.6423        0.6806
15   15    15   True  38.9969    True      NaN         NaN    1.0                  False            False          True       0.0377            1.0             41.0           50.4552        0.9623
16   16    16   True   0.2895    True      NaN         NaN    1.0                  False             True         False       0.8835            1.0              7.0           19.2356        0.1165
17   17    17   True  46.9728   False      NaN         NaN    1.0                  False             True         False       0.6426            1.0             22.0           31.4748        0.3574
18   18    18   True  45.3351   False      NaN         NaN    1.0                  False            False          True       0.0000            1.0             48.0           58.5594        1.2998
19   19    19   True  49.2198    True      NaN         NaN    1.0                  False             True         False       0.3449            1.0             33.0           43.9905        0.6551
20   20    20   True   5.2356   False      NaN         NaN    1.0                  False            False          True       0.0000            1.0             45.0           55.5389        1.1467
21   21    21   True  51.9528    True      NaN         NaN    1.0                  False            False          True       0.0000            1.0             49.0           61.2050        1.5074
22   22    22   True   4.7122   False      NaN         NaN    1.0                  False             True         False       0.6753            1.0             22.0           31.8811        0.3247
23   23    23   True  49.5949   False      NaN         NaN    1.0                  False             True         False       0.1569            1.0             38.0           48.0350        0.8431
24   24    24   True  22.0317    True      NaN         NaN    1.0                  False             True         False       0.7027            1.0             18.0           28.4578        0.2973
25   25    25   True  32.0162    True      NaN         NaN    1.0                  False             True         False       0.5097            1.0             30.0           39.3649        0.4903
26   26    26   True  56.7505    True      NaN         NaN    1.0                  False            False          True       0.7126            1.0             50.0           58.1730        1.2874
27   27    27   True  27.3852    True      NaN         NaN    1.0                  False             True         False       0.2962            1.0             32.0           42.0070        0.7038
28   28    28   True  40.8426    True      NaN         NaN    1.0                  False             True         False       0.6661            1.0             20.0           31.7865        0.3339
29   29    29   True  39.2750   False      NaN         NaN    1.0                  False             True         False       0.7260            1.0             15.0           26.3295        0.2740
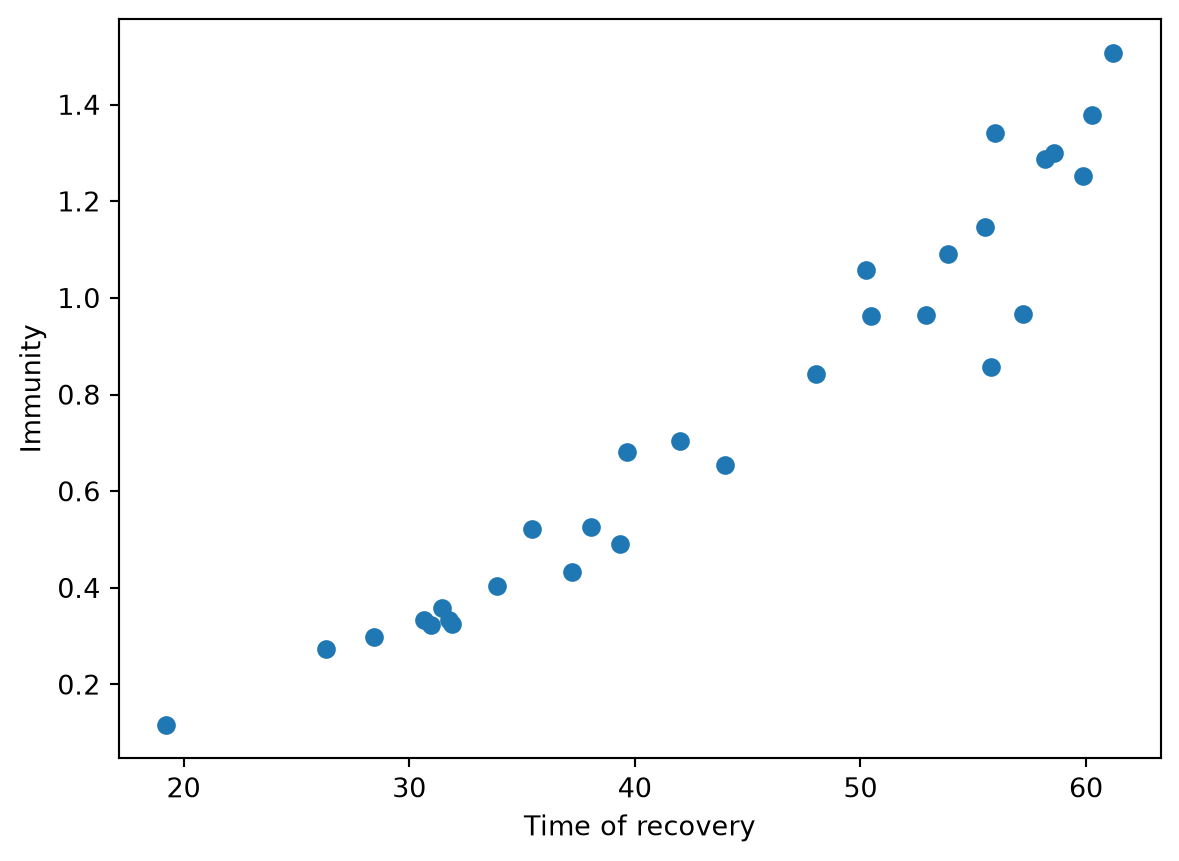
This is usually too much information to understand directly, but can be useful for producing summary statistics; for example, let’s say we want to understand the relationship between time since recovery and immunity:
import matplotlib.pyplot as pltplt.scatter(df['sis.ti_recovered'], df['sis.immunity'])plt.xlabel('Time of recovery')plt.ylabel('Immunity')plt.show()
Sometimes we want to explore a single agent in more detail. For this, there is a person() method, which will return all the attributes of that particular agent (equivalent to a single row in the dataframe):